 Kia Sedona: Multimedia Jack Repair procedures
Third generation YP (2014-2026) / Kia Sedona YP Service Manual / Body Electrical System / Audio / Multimedia Jack Repair procedures
| Removal |
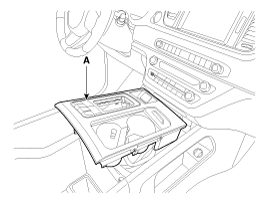
Multimedia Jack
| 1. |
Disconnect the negative (-) battery terminal. |
| 2. |
Remove the console upper cover (A).
(Refer to Body - "Floor Console Assembly")
|
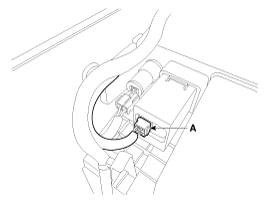
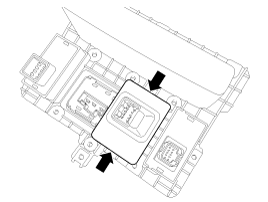
| 3. |
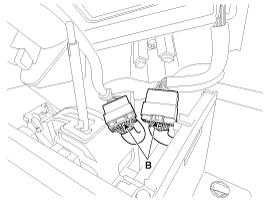
Disconnect the multimedia jack connector (A) and multi switch connector (B).
|
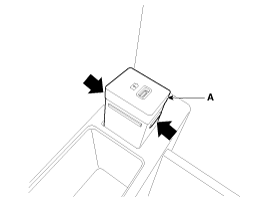
| 4. |
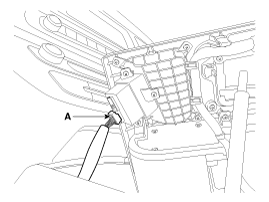
Remove the multimedia jcak (A) after releasing the fixed hooks.
|
USB Charger (Front Seat)
| 1. |
Disconnect the negative (-) battery terminal. |
| 2. |
Remove the rear console assembly.
(Refer to Body - "Floor Console Assembly") |
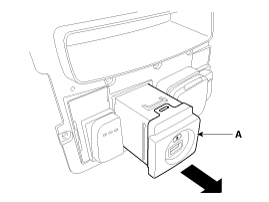
| 3. |
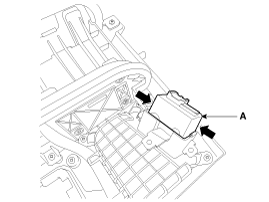
Disconnect the USB charger connector (A).
|
| 4. |
Remove the USB charger (A) after releasing the fixed hooks.
|
USB Charger (Rear Seat)
| 1. |
Disconnect the negative (-) battery terminal. |
| 2. |
Remove the rear console cover.
(Refer to Body - "Rear Console Cover") |
| 3. |
Remove the floor console tray (A) after loosening the screws.
|
| 4. |
Remove the rear console switch panel (A) after loosening the screws.
|
| 5. |
Remove the usb charger (A) after releasing the fixed hooks.
|
| Installation |
Multimedia Jack
| 1. |
Install the multimedia jcak. |
| 2. |
Connect the console upper cover connector. |
| 3. |
Install the console upper cover. |
| 4. |
Connect the negative (-) battery terminal. |
USB Charger (Front Seat)
| 1. |
Install the USB charger. |
| 2. |
Connect the USB charger connector. |
| 3. |
Install the rear console assembly. |
| 4. |
Connect the negative (-) battery terminal. |
USB Charger (Rear Seat)
| 1. |
Install the USB charger. |
| 2. |
Install the rear console switch panel. |
| 3. |
Install the floor console tray. |
| 4. |
Connect the USB charger connector. |
| 5. |
Install the rear console cover. |
| 6. |
Connect the negative (-) battery terminal. |
 Multimedia Jack Description and Operation
Description
The multimedia jack on the console upper cover is for
customers who like to listen to external portable music players like the
MP3 etc., through the vehicle''s sound system when it ...
 Troubleshooting
Troubleshooting
Customer Complaint Analysis Check Sheet
There are six areas where a problem can occur: wiring
harness, the radio, the CD player, and speaker. Troubleshooting enables
you to nar ...
Other Information:
General Safety Information and Caution
General Safety Information and Caution
Be careful when driving the vehicle using the smart cruise control system as follows.
•
The smart cruise control system ...
Intake Actuator Repair procedures
Inspection
1.
Turn the ignition switch OFF.
2.
Disconnect the intake actuator connector.
3.
Verify that the actuator operates to the recirculation position when 12V is connected to termina ...
Categories
- Home
- First Generation
- Second Generation
- Third generation
- Kia Sedona YP 2014-2026 Owners Manual
- Kia Sedona YP 2014-2026 Service Manual

Copyright © www.kisedona.com 2016-2026