
 Kia Sedona: Intake Actuator Repair procedures
Third generation YP (2014-2026) / Kia Sedona YP Service Manual / Heating,Ventilation And Air Conditioning / Blower / Intake Actuator Repair procedures
| Inspection |
| 1. |
Turn the ignition switch OFF. |
| 2. |
Disconnect the intake actuator connector. |
| 3. |
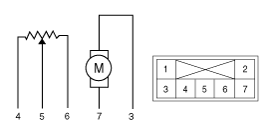
Verify that the actuator operates to the recirculation position when 12V is connected to terminal 3 and ground to terminal 7.
Verify that the intake actuator operates to the recirculated air position when connected in reverse.
|
| 4. |
Connect the intake actuator connector. |
| 5. |
Turn the ignition switch ON. |
| 6. |
Check the voltage between terminals 5 and 6.
Specification
It will feedback the current position of the actuator to controls. |
| 7. |
If the intake actuator does not operate well, substitute with a known-good intake actuator and check for proper operation. |
| 8. |
Replace the intake actuator if it is proved that there is a problem with it. |
| Replacement |
| 1. |
Disconnect the negative (-) battery terminal. |
| 2. |
Remove the glove box housing.
(Refer to Body - "Glove Box Housing") |
| 3. |
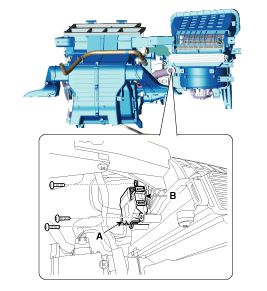
Disconnect the connector (A) and then remove the intake actuator (B) after loosening the mounting screw.
|
| 4. |
Install in the reverse order of removal. |
 Intake Actuator Description and Operation
Description
The intake actuator is located at the blower unit. It
regulates the intake door by a signal from the control unit. Pressing
the intake selection switch will shift between recirculat ...
 Rear Heater
...
Other Information:
Specifications
Specifications
Automatic Transaxle
ItemSpecificationTransaxle modelA6LF2Engine modelGasoline 3.3 GDITorque converter type3-element, 1-stage, 2-phase typeTorque converter sizeØ260mm (10.2362 in. ...
Front Disc Brake Components and Components Location
Components
1. Guide rod bolt2. Bleed screw3. Caliper carrier4. Caliper body5. Inner pad shim6. Brake pad7. Pad retainer
...
Categories
- Home
- First Generation
- Second Generation
- Third generation
- Kia Sedona YP 2014-2026 Owners Manual
- Kia Sedona YP 2014-2026 Service Manual

Copyright © www.kisedona.com 2016-2026