 Kia Sedona: Fluid Repair procedures
Third generation YP (2014-2026) / Kia Sedona YP Service Manual / Automatic Transaxle System / Hydraulic System / Fluid Repair procedures
| Inspection |
Automatic Transaxle Fluid (ATF) Level Check
When checking the ATF level, be careful not to allow foreign substance (like dust) to enter through the filler hole. |

| 1. |
Remove the battery and battery tray.
(Refer to Engine Electrical System - "Battery") |
| 2. |
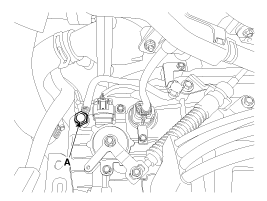
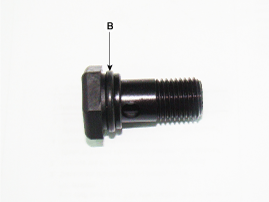
Add 0.7 liter of ATF ATF SP-IV after removing the eyebolt (A).
|
| 3. |
Start the engine to heat up the ATF.
|
| 4. |
Check that the temperature of the ATF is between 50°C and 60°C (122-140°F) using the GDS. |
| 5. |
Move the shift lever slowly from "P" to "D", then back to
"P". Repeat this sequence a total of two times and then move the shift
lever to "N" range.
|
| 6. |
Remove the under cover.
(Refer to Engine Mechanical System - "Engine Room Under Cover") |
| 7. |
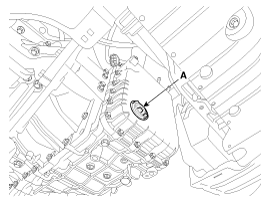
Lift the vehicle and remove the ATF level plug (A) from the valve body cover.
|
| 8. |
Check the ATF level.
|
| 9. |
Install the ATF level plug (A).
|
| 10. |
Lower the vehicle and install the eyebolt (A).
|
| Replacement |
| 1. |
Remove the under cover.
(Refer to Engine Mechanical System - "Engine Room Under Cover") |
| 2. |
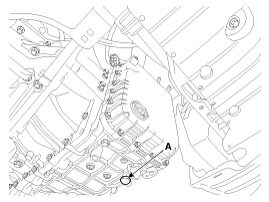
Remove the ATF drain plug (A), allow the fluid to drain out and then reinstall the drain plug.
|
| 3. |
Remove the battery and battery tray.
(Refer to Engine Electrical System - "Battery") |
| 4. |
Remove the eyebolt (A).
|
| 5. |
Fill the automatic transaxle with about 5.0 liters of ATF SP-IV through the ATF filler hole. |
| 6. |
Perform the ATF level check procedure.
(Refer to Fluid - "Inspection") |
 Fluid Components and Components Location
Components Location
1. ATF filler hole (eyebolt)2. ATF level plug3. ATF drain plug
...
 Valve Body Components and Components Location
Components Location
1. Automatic transaxle2. Valve body assembly
Components
1. Pressure control valve (PCV) adjust screw2. Solenoid valve bracket3. Oil temperature sensor4. Line pressure co ...
Other Information:
Rear Door Belt Outside Weatherstrip Repair procedures
Replacement
1.
Pull down rear door window glass by pressing the power window glass switch.
2.
After loosening the mounting screws, remove the rear door belt outside weatherstrip (A).
3.
In ...
Components and Components Location
Components Location
1. PCV Valve2. Canister3. Purge Control Solenoid Valve (PCSV)4. Fuel Tank Pressure Sensor (FTPS)5. Canister Close Valve (CCV)6. Fuel Level Sender (FLS)7. Fuel Tank Air Filt ...
Categories
- Home
- First Generation
- Second Generation
- Third generation
- Kia Sedona YP 2014-2026 Owners Manual
- Kia Sedona YP 2014-2026 Service Manual

Copyright © www.kisedona.com 2016-2026