 Kia Sedona: Crash Pad Center Panel Repair procedures
Third generation YP (2014-2026) / Kia Sedona YP Service Manual / Body (Interior and Exterior) / Crash Pad / Crash Pad Center Panel Repair procedures
| Replacement |
Put on gloves to protect your hands. |

|

| 1. |
Remove the floor console assembly.
(Refer to Floor Console - "Floor Console Assembly") |
| 2. |
Remove the center fascia panel.
(Refer to Crash Pad - "Center Fascia Panel") |
| 3. |
Remove the crash pad lower panel.
(Refer to Crash Pad - "Crash Pad Lower Panel") |
| 4. |
Remove the glove box housing.
(Refer to Crash Pad - "Glove Box Housing") |
| 5. |
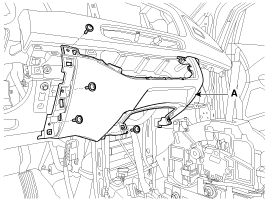
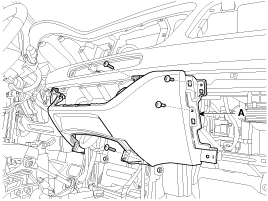
After loosening the mounting screws, remove the crash pad center lower panel (A).
|
| 6. |
Install in the reverse order of removal.
|
 Crash Pad Center Panel Components and Components Location
Component Location
1. Crash pad center lower panel
...
 Main Crash Pad Assembly Components and Components Location
Component Location
1. Main crash pad assembly
...
Other Information:
From the rear seat
1. Set the rear climate control selection (REAR ON) button in the front climate
control panel to the ON position.
2. Set the rear climate control selection (REAR LOCK) button in the front climate
...
Door Lock
Type A
Type B
1. Close all doors, engine hood and tailgate.
2. Press the lock button(1).
3. All doors and tailgate will lock. The hazard warning lights will blink once.
4. If the lock button ...
Categories
- Home
- First Generation
- Second Generation
- Third generation
- Kia Sedona YP 2014-2026 Owners Manual
- Kia Sedona YP 2014-2026 Service Manual

Copyright © www.kisedona.com 2016-2026