 Kia Sedona: Brake Line Repair procedures
Third generation YP (2014-2026) / Kia Sedona YP Service Manual / Brake System / Brake System / Brake Line Repair procedures
| Removal |
| 1. |
Disconnect the brake fiuid level switch connector, and remove the reservoir cap. |
| 2. |
Remove the brake fluid from the master cylinder reservior with a syringe.
|
| 3. |
Remove the wheel & tire. |
| 4. |
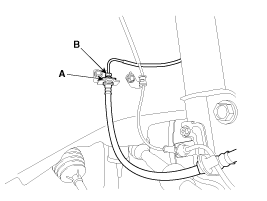
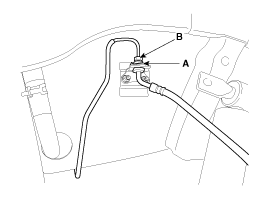
Disconnect the brake tube by loosening the tube flare nut (B).
Front
Rear
|
| 5. |
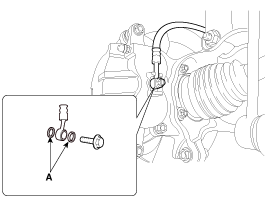
Remove the brake hose clip (A). |
| 6. |
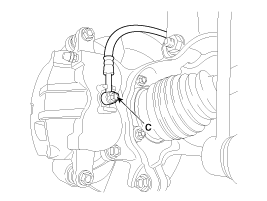
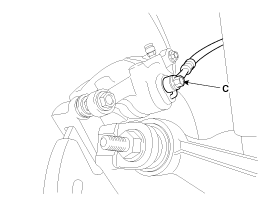
Disconnect the brake hose from the brake caliper by loosening the bolt (C).
Front
Rear
|
| Inspection |
| 1. |
Check the brake tubes for cracks, crimps and corrosion. |
| 2. |
Check the brake hoses for cracks, damage and fluid leakage. |
| 3. |
Check the brake tube flare nuts for damage and fluid leakage. |
| 4. |
Check brake hose mounting bracket for crack or deformation. |
| Installation |
| 1. |
Install in the reverse order of removal.
|
| 2. |
After installation, bleed the brake system.
(Refer to Brake system - "Brake system Bleeding") |
| 3. |
Check for spilled brake fluid. |
 Brake Line Components and Components Location
Components
...
 Brake Pedal Components and Components Location
Components
1. Cowl bracket2. Brake pedal member assembly3. Brake switch4. Return spring5. Brake pedal stopper6. Clevis pin7. Snap pin8. Brake pedal
...
Other Information:
Mode Control Actuator Repair procedures
Inspection
1.
Turn the ignition switch OFF.
2.
Disconnect the mode control actuator connector.
3.
Verify that the mode control actuator operates to the defrost mode when 12V is connected t ...
Transaxle ranges
The indicator in the instrument cluster displays the shift lever position when
the ignition switch is in the ON position.
P (Park)
Always come to a complete stop before shifting into P (Park). Thi ...
Categories
- Home
- First Generation
- Second Generation
- Third generation
- Kia Sedona YP 2014-2026 Owners Manual
- Kia Sedona YP 2014-2026 Service Manual
Copyright © www.kisedona.com 2016-2026


