 Kia Sedona: Thermostat Repair procedures
Third generation YP (2014-2024) / Kia Sedona YP Service Manual / Engine Mechanical System / Cooling System / Thermostat Repair procedures
| Removal |
Removal of the thermostat may have an adverse effect, causing
a reduction in cooling efficiency. Do not remove the thermostat, even
if the engine tends to overheat. |

| 1. |
Remove the engine room under cover.
(Refer to Engine And Transaxle Assembly - "Engine Room Under Cover") |
| 2. |
Drain engine coolant.
(Refer to Cooling System - "Coolant") |
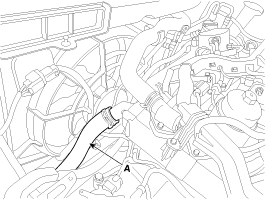
| 3. |
Disconnect the radiator lower hose (A).
|
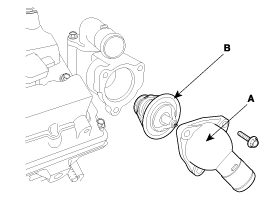
| 4. |
Remove the water inlet fitting (A) and the thermostat (B).
|
| 5. |
Install in the reverse order of removal. |
| Inspection |
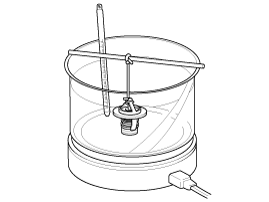
| 1. |
Immerse thermostat in water heated to over 95°C (203°F), then heat for at least 3 minutes to check valve lift.
|
| 2. |
Check the valve opening temperature.
If the valve opening temperature is not as specified, replace the thermostat. |
| 3. |
Check the valve lift.
If the valve lift is not as specified, replace the thermostat. |
 Thermostat Components and Components Location
Components
1. Water temperature control assembly2. Thermostat3. Water inlet fitting pipe
...
 Thermostat Troubleshooting
Troubleshooting
Trouble SymptomProbable CauseRemedyCoolant leakage
•
From the thermostat gasket
Check the mounting bolts
•
Check the torque of the mounting bolts
•
...
Other Information:
Crash Pad Center Panel Repair procedures
Replacement
Put on gloves to protect your hands.
•
When prying with a flat-tip screwdriver, wrap it with
protective tape, an ...
Vapor Hose and Fuel Filler Cap Repair procedures
Inspection
Vapor hose
1.
Check all the clamps for tightness and the connections for leakage.
2.
Visually check the vapor lines and hoses for cracks, leaks, loose connections, or deformation.
...
Categories
- Home
- First Generation
- Second Generation
- Third generation
- Kia Sedona YP 2014-2024 Owners Manual
- Kia Sedona YP 2014-2024 Service Manual
Copyright © www.kisedona.com 2016-2024