 Kia Sedona: Intake Actuator Repair procedures
Third generation YP (2014-2024) / Kia Sedona YP Service Manual / Heating,Ventilation And Air Conditioning / Blower / Intake Actuator Repair procedures
| Inspection |
| 1. |
Turn the ignition switch OFF. |
| 2. |
Disconnect the intake actuator connector. |
| 3. |
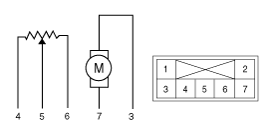
Verify that the actuator operates to the recirculation position when 12V is connected to terminal 3 and ground to terminal 7.
Verify that the intake actuator operates to the recirculated air position when connected in reverse.
|
| 4. |
Connect the intake actuator connector. |
| 5. |
Turn the ignition switch ON. |
| 6. |
Check the voltage between terminals 5 and 6.
Specification
It will feedback the current position of the actuator to controls. |
| 7. |
If the intake actuator does not operate well, substitute with a known-good intake actuator and check for proper operation. |
| 8. |
Replace the intake actuator if it is proved that there is a problem with it. |
| Replacement |
| 1. |
Disconnect the negative (-) battery terminal. |
| 2. |
Remove the glove box housing.
(Refer to Body - "Glove Box Housing") |
| 3. |
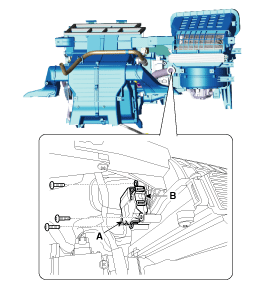
Disconnect the connector (A) and then remove the intake actuator (B) after loosening the mounting screw.
|
| 4. |
Install in the reverse order of removal. |
 Intake Actuator Description and Operation
Description
The intake actuator is located at the blower unit. It
regulates the intake door by a signal from the control unit. Pressing
the intake selection switch will shift between recirculat ...
 Rear Heater
...
Other Information:
Line Pressure Control Solenoid Vale Repair procedures
Inspection
1.
Turn ignition switch OFF.
2.
Remove the battery and battery tray.
(Refer to Engine Electrical System - "Battery")
3.
Disconnect the solenoid valve connector (A).
4.
Me ...
Auto Head lamp leveling Unit Repair procedures
Inspection
1.
Ignition "ON".
2.
Turn on the head lamp switch.
3.
Check for operation. If the aim of the head lamps changes smoothly when the head lamp leveling switch is turned.
4.
If ...
Categories
- Home
- First Generation
- Second Generation
- Third generation
- Kia Sedona YP 2014-2024 Owners Manual
- Kia Sedona YP 2014-2024 Service Manual
Copyright © www.kisedona.com 2016-2024


