Kia Sedona: Hood Assembly Repair procedures - Hood - Body (Interior and Exterior) - Kia Sedona YP Service ManualKia Sedona: Hood Assembly Repair procedures

Third generation YP (2014-2024) / Kia Sedona YP Service Manual / Body (Interior and Exterior) / Hood / Hood Assembly Repair procedures

Replacement
   
•
Be careful not to damage the hood and body.
   
•
When removing and installing the hood, work in a group of two or more.
•
When removing the clips, use a clip remover.
1.
After loosening the hood hinge (B) mounting bolts, remove the hood assembly (A).

Tightening torque :
21.6~26.5 N.m (2.2~2.7 kgf.m, 15.9~19.5 lb-ft)

2.
Install in the reverse order of removal.
   
•
Make sure that the hood locks/unlocks and opens/closes properly.
•
Adjust the hood alignment.
Hood Assembly Components and Components Location
Component Location 1. Hood assembly ...

Hood Insulator Pad Repair procedures
Replacement 1. 
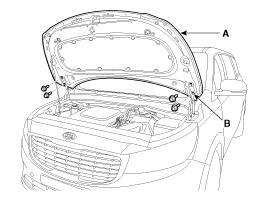
Using a clip remover, detach the clips, and remove the hood insulator pad (A).     • Be careful not to scratch the hood panel. 2. Install ...

Other Information:

Recommended engine coolant
When adding coolant, use only deionized water or soft water for your vehicle and never mix hard water in the coolant filled at the factory. An improper coolant mixture can result in serious m ...

Components and Components Location
Components 1. BSD unit2. BSD switch3. BSD warning lamp (Built in the outside mirror)4. Cluster ...

Categories


Copyright © www.kisedona.com 2016-2024