 Kia Sedona: Tail Gate Latch Repair procedures
Third generation YP (2014-2026) / Kia Sedona YP Service Manual / Body (Interior and Exterior) / Tail Gate / Tail Gate Latch Repair procedures
| Replacement |
Put on gloves to protect your hands. |

|

| 1. |
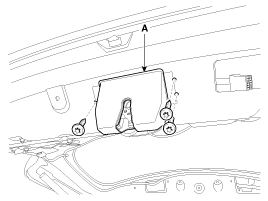
Remove the tail gate trim.
(Refer to Tail Gate - "Tail Gate Trim") |
| 2. |
Disconnect the tail gate latch connector (A). |
| 3. |
Disconnect the tail gate motor connector (B) after loosening the nuts.
|
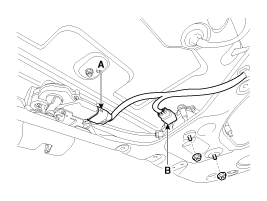
| 4. |
Loosen the torx driver and remove the tail gate latch assembly (A).
|
| 5. |
Install in the reverse order of removal.
|
 Tail Gate Latch Components and Components Location
Component Location
1. Tail gate latch assembly
...
 Tail Gate Back Panel Components and Components Location
Component Location
1. Tail gate back panel
...
Other Information:
Schematic Diagrams
Circuit Diagram (1)
Circuit Diagram (2)
Circuit Diagram (3)
Circuit Diagram (4)
SRSCM Connector terminal
Pin Function (Connector A)Pin Function (Connector B)1--1WRear Curtain Air Ba ...
Battery Sensor Description and Operation
Description
Vehicles have many control units that use more electricity.
These units control their own system based on information from various
sensors. It is important to provide a stable power ...
Categories
- Home
- First Generation
- Second Generation
- Third generation
- Kia Sedona YP 2014-2026 Owners Manual
- Kia Sedona YP 2014-2026 Service Manual

Copyright © www.kisedona.com 2016-2026