 Kia Sedona: Tail Gate Assembly Repair procedures
Third generation YP (2014-2026) / Kia Sedona YP Service Manual / Body (Interior and Exterior) / Tail Gate / Tail Gate Assembly Repair procedures
| Replacement |
Wear gloves to protect hands from injury. |

When removing and installing the tail gate, work in a group of two or more. |

| 1. |
Remove the tail gate upper trim.
(Refer to Tail Gate - "Tail Gate Trim") |
| 2. |
Remove the tail gate side trim.
(Refer to Tail Gate - "Tail Gate Trim") |
| 3. |
Remove the tail gate trim.
(Refer to Tail Gate - "Tail Gate Trim") |
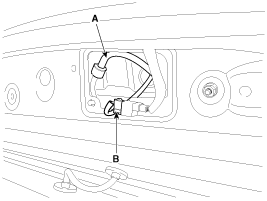
| 4. |
Disconnect the washer nozzle hose (A) and high mounted stop lamp connector (B).
|
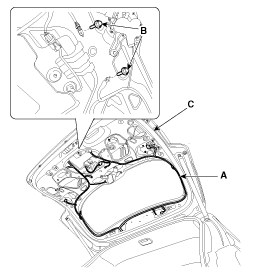
| 5. |
Disconnect the connectors and tail gate wiring harness (A). |
| 6. |
Loosen the ground bolts (B). |
| 7. |
After loosening the mounting bolts, remove the tail gate assembly (C).
|
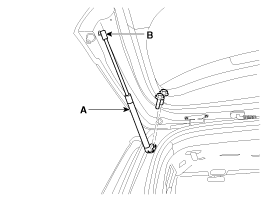
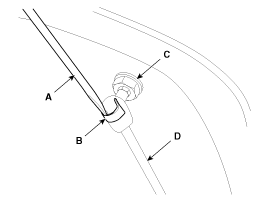
| 8. |
Remove the mounting clip (B) and then remove the tail gate lifter (A).
|
| 9. |
Install in the reverse order of removal.
|

 Tail Gate Assembly Components and Components Location
Component Location
1. Tail gate assembly
...
 Tail Gate Trim Components and Components Location
Component Location
1. Tail gate trim
...
Other Information:
Electronic Stability Control (ESC) OFF Indicator Light
This indicator light illuminates :
Once you set the ignition switch or Engine Start/Stop Button to the ON position.
- It illuminates for approximately 3 seconds and then goes off.
When you d ...
Transaxle ranges
The indicator in the instrument cluster displays the shift lever position when
the ignition switch is in the ON position.
P (Park)
Always come to a complete stop before shifting into P (Park). Thi ...
Categories
- Home
- First Generation
- Second Generation
- Third generation
- Kia Sedona YP 2014-2026 Owners Manual
- Kia Sedona YP 2014-2026 Service Manual

Copyright © www.kisedona.com 2016-2026