 Kia Sedona: Programming
Your vehicle may require the ignition switch to be turned to the ACC position for programming and/or operation of HomeLink. It is also recommended that a new battery be replaced in the hand-held transmitter of the device being programmed to HomeLink for quicker training and accurate transmission of the radiofrequency.
Follow these steps to train your HomeLink mirror:
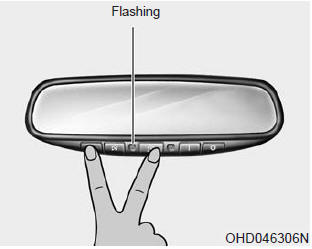
1. When programming the buttons for the first time, press and hold the left and
center buttons ( ,
, )
simultaneously until the indicator light begins to flash after approximately 20
seconds. (This procedure erases the factory-set default codes. Do not perform this
step when programming the additional HomeLink buttons.)
)
simultaneously until the indicator light begins to flash after approximately 20
seconds. (This procedure erases the factory-set default codes. Do not perform this
step when programming the additional HomeLink buttons.)
✽ NOTICE
For non rolling code garage door openers, follow steps 2 - 3.
For rolling code garage door openers, follow steps 2 - 6.
For Canadian Programming, please follow the Canadian Programming section.
For help with determining whether your garage door opener is nonrolling code
or rolling code, please refer to the garage door openers owner Shift to P or N to start engine (for smart key system) Detecting area
To operate the electric rearview mirror
Press the I button (1) to turn the automatic- dimming function on. The mirror
indicator light will illuminate.
Press the O button (2) to turn the automati ...
 Electrochromic mirror with HomeLink system
To train a garage door opener (or other rolling code equipped devices) with the
rolling code feature, follow these instructions after completing the ...
 Rolling code programming
Other Information:
...
The Smart Tailgate operates with a welcome alert if the smart key is detected
within 50~100 cm (20~40 inches) from the tailgate.
The alert stops at once if the smart key is positioned outsid ...
Categories
- Home
- First Generation
- Second Generation
- Third generation
- Kia Sedona YP 2014-2026 Owners Manual
- Kia Sedona YP 2014-2026 Service Manual
