 Kia Sedona: Climate Seat Unit Repair procedures
Third generation YP (2014-2026) / Kia Sedona YP Service Manual / Body Electrical System / Seat Electrical / Climate Seat Unit Repair procedures
| Removal |
[Ventilation Blower]
| 1. |
Disconnect the negative (-) battery terminal. |
| 2. |
Remove the front seat assembly.
(Refer to Body - "Front Seat Assembly") |
| 3. |
Remove the front seat outer shield cover.
(Refer to Body - "Front Seat Outer Shield Cover") |
| 4. |
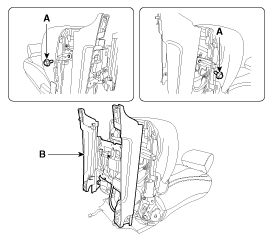
Separate the front seat track (B) after loosening the bolts (A).
|
| 5. |
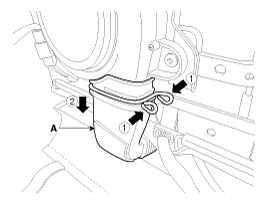
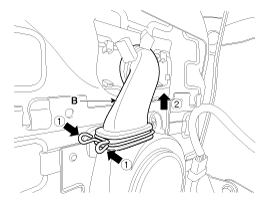
Disconnect the ventilation seat back duct (A) and ventilation seat cushion duct (B) after pushing the clips.
|
| 6. |
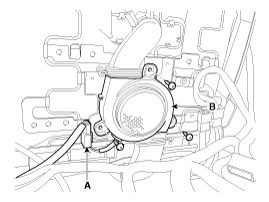
Disconnect the connector (A) and then remove the blower fan (B) after loosening the screws.
|
[Ventilation Seat Unit]
| 1. |
Disconnect the negative (-) battery terminal. |
| 2. |
Remove the front seat assembly [RH].
(Refer to Body - "Front Seat Assembly") |
| 3. |
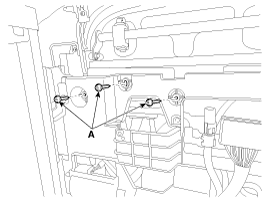
Loosen the ventilation seat unit mounting screws (A).
|
| 4. |
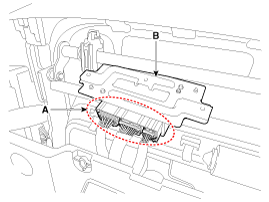
Remove the ventilation seat unit (B) after disconnecting the connectors (A).
|
| Installation |
[Ventilation Blower]
| 1. |
Disconnect the connector after installing the blower fan. |
| 2. |
Install the ventilation seat back duct and ventilation seat cushion duct. |
| 3. |
Install the front seat track. |
| 4. |
Install the front seat outer shield cover. |
| 5. |
Install the front seat assembly. |
| 6. |
Connect the negative (-) battery terminal. |
[Ventilation Seat Unit]
| 1. |
Connect the ventilation seat unit connector. |
| 2. |
Install the ventilation seat. |
| 3. |
Install the front seat assembly [RH]. |
| 4. |
Connect the negative (-) battery terminal. |
 Climate Seat Unit Description and Operation
Description
The ventilated seat system generates cool wind by the Push
method in the blower mounted under the seat which then travels through
ducts to the seat back and cushion.
&n ...
 Massage Control Unit Components and Components Location
Components
Mechanical Lumbar Support Assembly
[4 Way Lumbar]
[2 Way Lumbar]
...
Other Information:
Horn
To sound the horn, press the horn symbols on your steering wheel. Check the horn
regularly to be sure it operates properly.
✽ NOTICE
To sound the horn, press the area indicated by the hor ...
Emergency towing
Front
Rear
If towing is necessary, we recommend you to have it done by an authorized Kia
dealer or a commercial tow truck service.
If towing service is not available in an emergency, your veh ...
Categories
- Home
- First Generation
- Second Generation
- Third generation
- Kia Sedona YP 2014-2026 Owners Manual
- Kia Sedona YP 2014-2026 Service Manual
Copyright © www.kisedona.com 2016-2026

