 Kia Sedona: Rheostat Repair procedures
Third generation YP (2014-2026) / Kia Sedona YP Service Manual / Body Electrical System / Lighting System / Rheostat Repair procedures
| Inspection |
| 1. |
Disconnect the negative (-) battery terminal. |
| 2. |
Remove the crash pad lower panel.
(Refer to Body - "Crash Pad Lower Panel") |
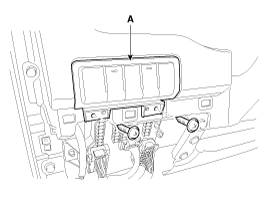
| 3. |
Remove the crash pad lower switch (A) after loosening the mounting screws.
|
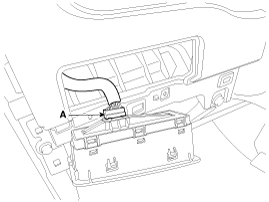
| 4. |
Remove the rheostat switch connector (A).
|
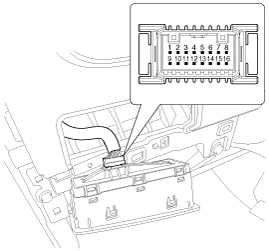
| 5. |
Check for intensity of rheostat switch. If the light
intensity of the lamps changes smoothly without any flickering when the
rheostat is turned on, it can be assumed that the rheostat is operating
normally.
|
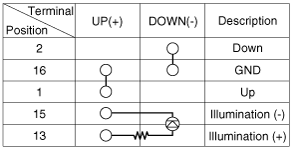
 Rheostat Schematic Diagrams
Circuit Diagram
...
 Fog Lamps Repair procedures
Removal
1.
Disconnect the negative (-) battery terminal.
2.
Remove the front bumper cover.
(Refer to Body - "Front Bumper Cover")
3.
Remove the front fog lamp assembly (A) after loosening ...
Other Information:
Removing the tumble seat (for 8 passenger vehicle)
1. Insert the seat belt in the belt assembly cover.
2. Insert the seat belt buckle in the seat cushion pocket.
3. Lower the headrest to the lowest position.
4. Slide the seat to the farthest ...
Position & Tail light
When the light switch is in the parking light position, the tail, license and
instrument panel lights will turn ON. ...
Categories
- Home
- First Generation
- Second Generation
- Third generation
- Kia Sedona YP 2014-2026 Owners Manual
- Kia Sedona YP 2014-2026 Service Manual

Copyright © www.kisedona.com 2016-2026