 Kia Sedona: Tail Gate Trim Repair procedures
Third generation YP (2014-2026) / Kia Sedona YP Service Manual / Body (Interior and Exterior) / Tail Gate / Tail Gate Trim Repair procedures
| Replacement |
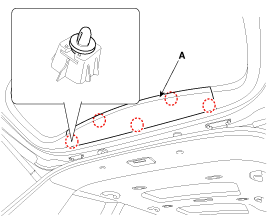
[Tail gate upper trim]
Put on gloves to protect your hands. |

|

| 1. |
Using a screwdriver or remover, remove the tail gate upper trim (A).
|
| 2. |
Install in the reverse order of removal.
|

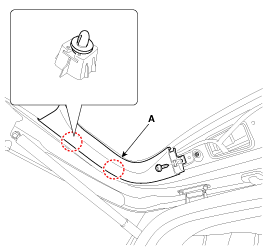
[Tail gate side trim]
Put on gloves to protect your hands. |
|
| 1. |
Remove the tail gate upper trim. |
| 2. |
After loosening the mounting screw, remove the tail gate side trim (A).
|
| 3. |
Install in the reverse order of removal.
|
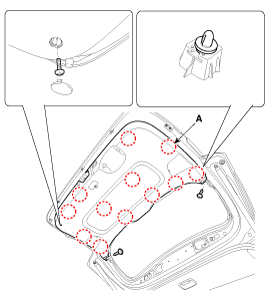
[Tail gate trim]
Put on gloves to protect your hands. |
|
| 1. |
Remove the tail gate upper trim. |
| 2. |
Remove the tail gate side trim. |
| 3. |
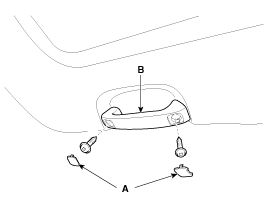
Remove the inside handle cap (A). |
| 4. |
Loosen the screw and remove the inside handle (B).
|
| 5. |
After loosening the mounting slips and screws, remove the tail gate trim (A).
|
| 6. |
Install in the reverse order of removal.
|
 Tail Gate Trim Components and Components Location
Component Location
1. Tail gate trim
...
 Tail Gate Latch Components and Components Location
Component Location
1. Tail gate latch assembly
...
Other Information:
Front Seat Cushion Cover Repair procedures
Replacement
•
When prying with a flat-tip screwdriver, wrap it with
protective tape, and apply protective tape around the related parts, to
prevent damage. ...
Positive Crankcase Ventilation (PCV) Valve Repair procedures
Removal
1.
Release the PCV pad.
2.
Disconnect the vapor hose (A).
3.
Remove the PCV valve (B).
Inspection
1.
Insert a thin stick (A) into the PCV valve (B) from the threaded side to ...
Categories
- Home
- First Generation
- Second Generation
- Third generation
- Kia Sedona YP 2014-2026 Owners Manual
- Kia Sedona YP 2014-2026 Service Manual

Copyright © www.kisedona.com 2016-2026