 Kia Sedona: Brake Line Repair procedures
Third generation YP (2014-2026) / Kia Sedona YP Service Manual / Brake System / Brake System / Brake Line Repair procedures
| Removal |
| 1. |
Disconnect the brake fiuid level switch connector, and remove the reservoir cap. |
| 2. |
Remove the brake fluid from the master cylinder reservior with a syringe.
|

| 3. |
Remove the wheel & tire. |
| 4. |
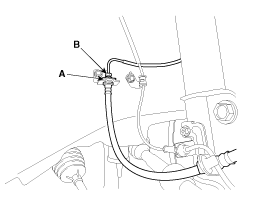
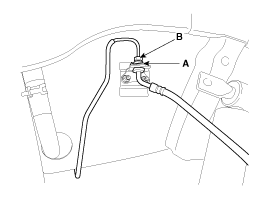
Disconnect the brake tube by loosening the tube flare nut (B).
Front
Rear
|
| 5. |
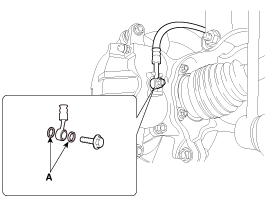
Remove the brake hose clip (A). |
| 6. |
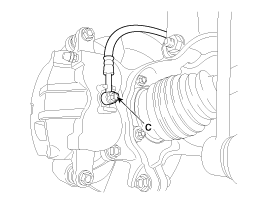
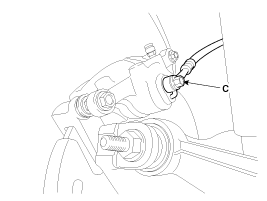
Disconnect the brake hose from the brake caliper by loosening the bolt (C).
Front
Rear
|
| Inspection |
| 1. |
Check the brake tubes for cracks, crimps and corrosion. |
| 2. |
Check the brake hoses for cracks, damage and fluid leakage. |
| 3. |
Check the brake tube flare nuts for damage and fluid leakage. |
| 4. |
Check brake hose mounting bracket for crack or deformation. |
| Installation |
| 1. |
Install in the reverse order of removal.
|
| 2. |
After installation, bleed the brake system.
(Refer to Brake system - "Brake system Bleeding") |
| 3. |
Check for spilled brake fluid. |
 Brake Line Components and Components Location
Components
...
 Brake Pedal Components and Components Location
Components
1. Cowl bracket2. Brake pedal member assembly3. Brake switch4. Return spring5. Brake pedal stopper6. Clevis pin7. Snap pin8. Brake pedal
...
Other Information:
Outside rearview mirror may not alert the driver when
- The outside rearview mirror housing is severely polluted
- The window is severely polluted
- The windows are severely tinted.
This device complies with Industry Canada licence-exempt RSS standard ...
Armed stage
Park the vehicle and stop the engine. Arm the system as described below.
1. Remove the ignition key from the ignition switch and exit the vehicle.
2. Make sure that all doors (and tailgate) and engi ...
Categories
- Home
- First Generation
- Second Generation
- Third generation
- Kia Sedona YP 2014-2026 Owners Manual
- Kia Sedona YP 2014-2026 Service Manual

Copyright © www.kisedona.com 2016-2026