
 Kia Sedona: Seat Heater Repair procedures
Third generation YP (2014-2026) / Kia Sedona YP Service Manual / Body Electrical System / Seat Electrical / Seat Heater Repair procedures
| Inspection |
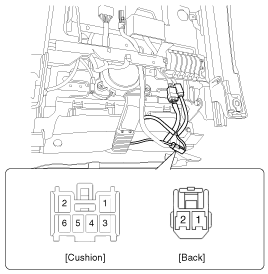
First Row Seat Heater
| 1. |
Check for continuity and measure the resistance between terminals No 3 and No 6.
|
| 2. |
Operate the seat heater after connecting the connector, and
then check the thermostat by measuring the temperature of seat surface.
|
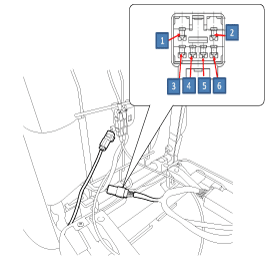
Second Row Seat Heater
| 1. |
Check for continuity and measure the resistance between terminals No 1 and No 4.
|
| 2. |
Operate the seat heater after connecting the connector, and
then check the thermostat by measuring the temperature of seat surface.
|
 Seat Heater Schematic Diagrams
Circuit Diagram
Connector Pin Information
No.DescriptionNo.Description1Power Seat Batt (+)18Left NTC (+)2Left air ventilation/heater cushion batt (+)19Air ventilation/heater ECU batt (+)3Left ai ...
 Seat Heater Switch Components and Components Location
Components
1. Driver seat heater switch2. Assist seat heater switch
1. Second row seat heater switch [LH]2. Second row seat heater switch [RH]
...
Other Information:
Heater & A/C Control Unit (DATC) Components and Components Location
Components (1)
Control Panel (AUDIO Type)
Connector Pin Function
Connector Pin NoFunctionConnector Pin NoFunctionA1ILL+ (TAIL)A29CLEAN CIGNAL2SENSOR REF (+5V)30-3-31-4-32-5MODE ACT' ...
Canister Close Valve (CCV) Repair procedures
Inspection
1.
Turn the ignition switch OFF.
2.
Disconnect the CCV connector.
3.
Measure resistance between the CCV terminal 1 and 2.
4.
Check that the resistance is within the specific ...
Categories
- Home
- First Generation
- Second Generation
- Third generation
- Kia Sedona YP 2014-2026 Owners Manual
- Kia Sedona YP 2014-2026 Service Manual

Copyright © www.kisedona.com 2016-2026