 Kia Sedona: Oil Pan Repair procedures
Third generation YP (2014-2026) / Kia Sedona YP Service Manual / Engine Mechanical System / Lubrication System / Oil Pan Repair procedures
| Removal |
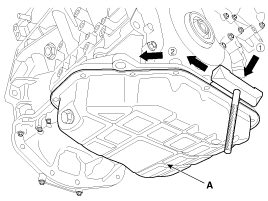
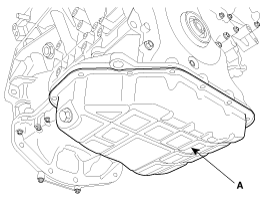
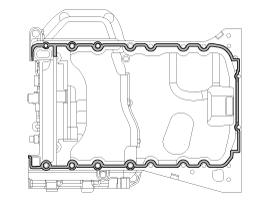
[Lower oil pan]
| 1. |
Remove the engine room under cover.
(Refer to Engine And Transaxle Assembly - "Engine Room Under Cover") |
| 2. |
Drain the engine oil.
(Refer to Lubrication System - "Engine Oil") |
| 3. |
Remove the lower oil pan (A).
Insert the blade of SST (09215-3C000) between the upper oil
pan and lower oil pan. Cut off applied sealer and remove the lower oil
pan.
|

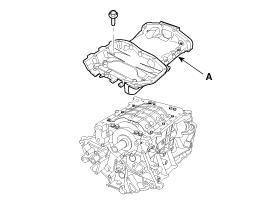
[Upper oil pan]
| 1. |
Remove the engine assembly from the vehicle.
(Refer to Engine And Transaxle Assembly - "Engine And Transaxle Assembly") |
| 2. |
Attach the engine to engine stand for disassembly. |
| 3. |
Remove the timing chain.
(Refer to Timing System - "Timing Chain") |
| 4. |
Remove the lower oil pan.
(Refer to Lubrication System - "Oil Pan") |
| 5. |
Remove the oil pump.
(Refer to Lubrication System - "Oil Pump") |
| 6. |
Remove the LH/RH exhaust manifold stays.
(Refer to Intake And Exhaust System - "Exhaust Manifold") |
| 7. |
Remove the upper oil pan (A).
Insert the blade of SST (09215-3C000) between the upper oil
pan and cylinder block. Cut off applied sealer and remove the upper oil
pan.
|
| Installation |
[Lower oil pan]
| 1. |
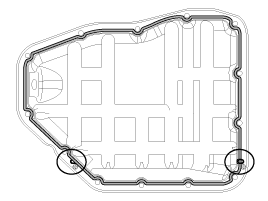
Install the lower oil pan (A).
|
| 2. |
After assembly, wait for at least 30 minutes before filling the engine with oil. |
| 3. |
Install the other parts in the reverse order of removal. |
[Upper oil pan]
| 1. |
Install the upper oil pan.
|
| 2. |
Install the other parts in the reverse order of removal. |
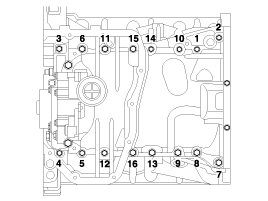
 Oil Pan Components and Components Location
Components
1. Upper oil pan2. Lower oil pan3. Drain plug4. Drain plug gasket
...
 Oil Pump Components and Components Location
Components
1. Oil pump2. O-ring3. Oil pump sprocket4. Oil pump chain cover
...
Other Information:
Description and Operation
Description
The SMART KEY system is a system that allows the user to
access and operate a vehicle in a very convenient way. To access the
vehicle, no traditional key or remote control unit is n ...
Line Pressure Control Solenoid Vale Specifications
Specification
Item SpecificationControl typeN/H (Normal High)Control pressure kpa (kgf/cm², psi)500.14 ~ 9.81 (5.1 ~ 0.1, 72.54 ~ 1.42)Current value (mA) 50 ~ 850Coil resistance(Ω)5.1 ± 0.3
...
Categories
- Home
- First Generation
- Second Generation
- Third generation
- Kia Sedona YP 2014-2026 Owners Manual
- Kia Sedona YP 2014-2026 Service Manual

Copyright © www.kisedona.com 2016-2026