 Kia Sedona: Inhibitor Switch Repair procedures
Third generation YP (2014-2026) / Kia Sedona YP Service Manual / Automatic Transaxle System / Automatic Transaxle Control System / Inhibitor Switch Repair procedures
| Inspection |
Power Circuit Inspection
| 1. |
Disconnect the Inhibitor switch connector. |
| 2. |
Ignition KEY "ON"" & Engine "OFF".. |
| 3. |
Measure voltage between supplied power and ground at inhibitor switch circuit.
|
Signal Circuit Inspection
| 1. |
Connect the Inhibitor switch connector. |
| 2. |
Ignition KEY "ON" & Engine "OFF". |
| 3. |
Measure the voltages between each terminal and chassis ground in each range (P, R, N, D).
Signal Code Table
|
| Removal |
| 1. |
Place the shift lever into the "N" position. |
| 2. |
Remove the battery and battery tray.
(Refer to Engine Electrical System - "Battery") |
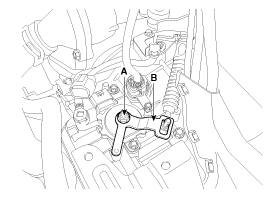
| 3. |
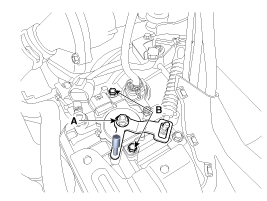
Disconnect the inhibitor switch connector (A) and loosen the shift cable mounting nut (B).
|

| 4. |
Remove the manual control lever (B) and the washer after removing a nut (A).
|
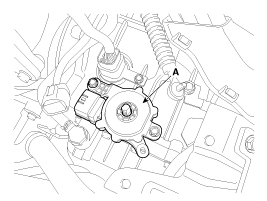
| 5. |
Remove the inhibitor switch (A) after loosening the bolts.
|
| Installation |
| 1. |
Check that the shift lever is placed in the "N" position |
| 2. |
Install the inhibitor switch (A).
|

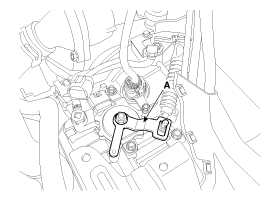
| 3. |
Install the manual control lever (A).
|
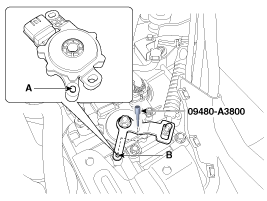
| 4. |
Align the hole (B) in the manual control lever with the "N"
position hole (A) of the inhibitor switch and then insert the SST
inhibitor switch guide pin (09480-A3800).
|
| 5. |
Tighten the nut (A) and bolts (B) to the specified torque.
|
| 6. |
Remove the SST (09480-A3800) from the adjusment hole. |
| 7. |
Connect the inhibitor switch connector (A). |
| 8. |
Install the shift cable by tightening nut (B).
|
| 9. |
Install the battery and battery tray.
(Refer to Engine Electrical System - "Battery") |
 Inhibitor Switch Schematic Diagrams
Circuit Diagram
...
 Shift Lever Components and Components Location
Components
1. Shift lever2. Shift lever bracket3. Main shaft4. Manual mode switch housing5. Shift lock solenoid6. Key interlock switch7. Main connector8. Shift cable assembly9. Shift cable retain ...
Other Information:
35R Clutch Control Solenoid Valve(35R/C_VFS) Repair procedures
Inspection
1.
Turn ignition switch OFF.
2.
Remove the battery and battery tray.
(Refer to Engine Electrical System - "Battery")
3.
Disconnect the solenoid valve connector (A).
4.
Me ...
Rear Transverse Trim Components and Components Location
Component Location
1. Rear transverse trim
...
Categories
- Home
- First Generation
- Second Generation
- Third generation
- Kia Sedona YP 2014-2026 Owners Manual
- Kia Sedona YP 2014-2026 Service Manual

Copyright © www.kisedona.com 2016-2026