 Kia Sedona: Hood Assembly Repair procedures
Third generation YP (2014-2026) / Kia Sedona YP Service Manual / Body (Interior and Exterior) / Hood / Hood Assembly Repair procedures
| Replacement |
|

|

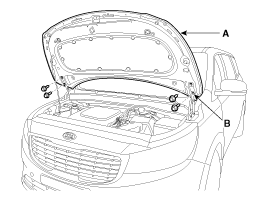
| 1. |
After loosening the hood hinge (B) mounting bolts, remove the hood assembly (A).
|
| 2. |
Install in the reverse order of removal.
|
 Hood Assembly Components and Components Location
Component Location
1. Hood assembly
...
 Hood Insulator Pad Repair procedures
Replacement
1.
Using a clip remover, detach the clips, and remove the hood insulator pad (A).
•
Be careful not to scratch the hood panel.
2.
Install ...
Other Information:
Seatback angle
Push the control switch forward or backward to move the seatback to the desired
angle. Release the switch once the seat reaches the desired position. ...
Clock
Hour (1)
Pressing the H button will advance the time displayed by one hour.
Minute (2)
Pressing the M button will advance the time displayed by one minute.
To change the 24 hour format to the 12 ...
Categories
- Home
- First Generation
- Second Generation
- Third generation
- Kia Sedona YP 2014-2026 Owners Manual
- Kia Sedona YP 2014-2026 Service Manual

Copyright © www.kisedona.com 2016-2026