 Kia Sedona: Front Washer Motor Repair procedures
Third generation YP (2014-2026) / Kia Sedona YP Service Manual / Body Electrical System / Windshield Wiper/Washer / Front Washer Motor Repair procedures
| Inspection |
Front Washer Motor
| 1. |
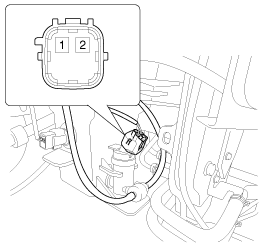
With the washer motor connected to the reservoir tank, fill the reservoir tank with water.
|

| 2. |
Connect positive (+) battery cables to terminal 2 and negative (-) battery cables to terminal 1. |
| 3. |
Check that the motor operates normally, the washer motor runs and water sprays from the front nozzles. |
| 4. |
If there is an abnormality, replace the washer motor.
[Front washer]
|
Washer Fluid Level Sensor Switch
| 1. |
Disconnect the negative (-) battery terminal. |
| 2. |
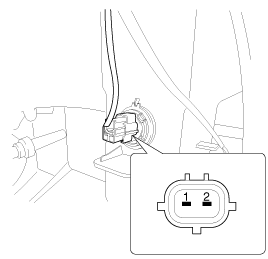
Drain the washer fluid to less than 600 cc. |
| 3. |
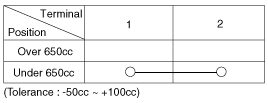
Check for continuity between terminals No. 1 and No. 2 in each float position.
There should be continuity when the float is down.
There should be no continuity when the float is up. |
| 4. |
If the continuity is not as specified, replace the washer fluid level switch.
|
| 5. |
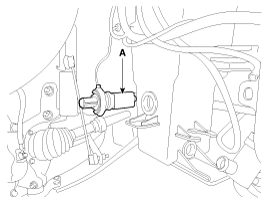
If the continuity is not as specified, replace the washer fluid level switch (A).
|
| Removal |
Front Washer Motor
| 1. |
Disconnect the negative (-) battery terminal. |
| 2. |
Remove the engine room under cover.
(Refer to Engine Mechanical System - "Engine Room Under Cover") |
| 3. |
Remove the front wheel guard [RH].
(Refer to Body - "Front Wheel Guard") |
| 4. |
Drain the washer fluid to less than 650 cc. |
| 5. |
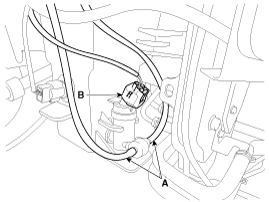
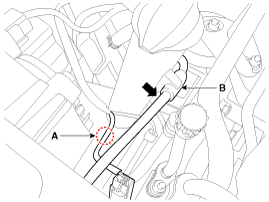
Disconnect the washer hose (A) and washer motor connector (B).
|
| 6. |
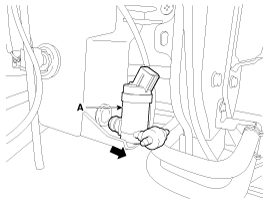
Remove the front washer motor (A).
|
Washer Fluid Level Sensor Switch
| 1. |
Disconnect the negative (-) battery terminal. |
| 2. |
Remove the engine room under cover.
(Refer to Engine Mechanical System - "Engine Room Under Cover") |
| 3. |
Remove the front wheel guard [RH].
(Refer to Body - "Front Wheel Guard") |
| 4. |
Drain the washer fluid to less than 650 cc. |
| 5. |
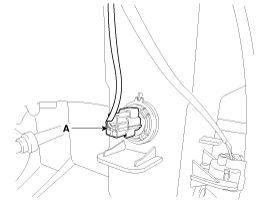
Disconnect the washer fluid level sensor switch connector (A).
|
| 6. |
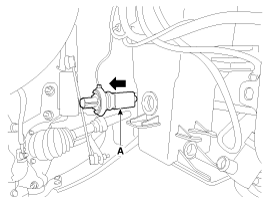
Remove the washer fluid level sensor switch (A).
|
Reservoir Tank
| 1. |
Disconnect the negative (-) battery terminal. |
| 2. |
Remove the engine room under cover.
(Refer to Engine Mechanical System - "Engine Room Under Cover") |
| 3. |
Remove the front wheel guard [RH].
(Refer to Body - "Front Wheel Guard") |
| 4. |
Drain the washer fluid to less than 650 cc. |
| 5. |
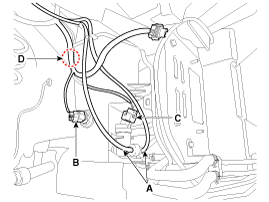
Disconnect the washer hose (B) after disconnecting the reservoir tank mounting clip (A).
|
| 6. |
Disconnect the washer hose (A), washer fluid level sensor switch connector (B), and washer motor connector (C). |
| 7. |
Disconnect the mounting clip (D).
|
| 8. |
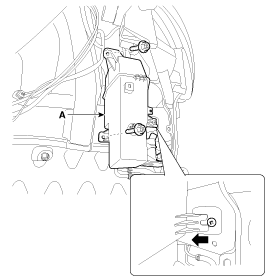
Remove the reservoir (A) after loosening the mounting bolts.
|
| Installation |
Front Washer Motor
| 1. |
If Necessary, clean the washer motor filter.
|
| 2. |
Install the front washer motor. |
| 3. |
Install the front washer motor connector. |
| 4. |
Install the front wheel guard [RH]. |
| 5. |
Install the engine room under cover. |
| 6. |
Connect the negative (-) battery terminal. |
Washer Fluid Level Sensor Switch
| 1. |
Install the washer fluid level sensor switch. |
| 2. |
Install the washer fluid level sensor connector. |
| 3. |
Install the front wheel guard [RH]. |
| 4. |
Install the engine room under cover. |
| 5. |
Connect the negative (-) battery terminal. |
Reservoir Tank
| 1. |
If necessary, clean the washer motor filter.
|
| 2. |
Install the reservoir tank. |
| 3. |
Install the washer motor hose and connectors. |
| 4. |
Install the front wheel guard [RH]. |
| 5. |
Install the engine room under cover. |
| 6. |
Connect the negative (-) battery terminal. |
 Front Wiper Motor Repair procedures
Removal
1.
Disconnect the negative (-) battery terminal.
2.
If necessary, release the wiper blade fixing clip by pulling up and remove the wiper blade from the inside radius of wiper arm.
3 ...

Other Information:
Rear Pillar Trim Components and Components Location
Component Location
1. Rear pillar trim
...
Components and Components Location
Components
1. Steering column shaft2. ECU3. Motor4. Steering gear box
...
Categories
- Home
- First Generation
- Second Generation
- Third generation
- Kia Sedona YP 2014-2026 Owners Manual
- Kia Sedona YP 2014-2026 Service Manual

Copyright © www.kisedona.com 2016-2026