 Kia Sedona: Antenna Repair procedures
Third generation YP (2014-2026) / Kia Sedona YP Service Manual / Body Electrical System / Audio / Antenna Repair procedures
| Inspection |
Antenna Cable
| 1. |
Remove the antenna jack from the audio unit and antenna. |
| 2. |
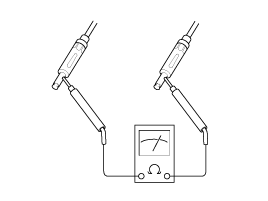
Check for continuity between the center poles of antenna cable.
|
| 3. |
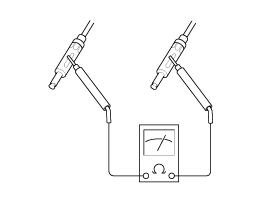
Check for continuity between the outer poles of antenna cable. There should be continuity.
|
| 4. |
If there is no continuity, replace the antenna cable. |
| 5. |
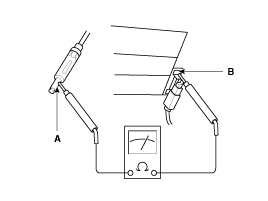
Check for continuity between the center pole (A) and outer pole (B) of antenna cable. There should be no continuity.
|
| 6. |
If there is continuity, replace the antenna cable. |
| Removal |
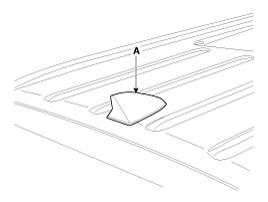
Roof antenna
| 1. |
Disconnect the negative (-) battery terminal. |
| 2. |
Remove the rear roof trim.
(Refer to Body - "Roof Trim Assembly") |
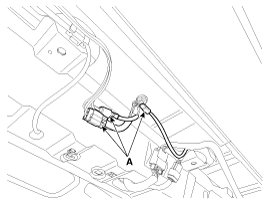
| 3. |
Disconnect the roof antenna connector (A).
|
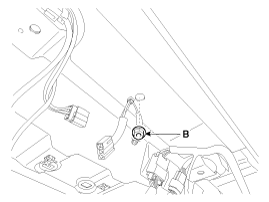
| 4. |
Remove the roof antenna (A) after loosening a nut (B).
|
| Installation |
Roof anenna
| 1. |
Install the roof antenna. |
| 2. |
Connect the roof antenna connectors. |
| 3. |
Install the roof trim assembly.
|

 Antenna Components and Components Location
Components
...
 Audio Remote Control Components and Components Location
Components
1. Left Remote Control Switch2. Right Remote Control Switch
...
Other Information:
Water Jacket Seperator Components and Components Location
Components
1. Water jacket separator
...
Driving Assist
Smart Cruise Control Response (if equipped)
Choose the sensitivity of the smart cruise control.
Rear Cross Traffic Alert (if equipped)
If this item is checked, rear cross traffic alert function wil ...
Categories
- Home
- First Generation
- Second Generation
- Third generation
- Kia Sedona YP 2014-2026 Owners Manual
- Kia Sedona YP 2014-2026 Service Manual

Copyright © www.kisedona.com 2016-2026