 Kia Sedona: Ambient Temperature Sensor Repair procedures
Third generation YP (2014-2026) / Kia Sedona YP Service Manual / Heating,Ventilation And Air Conditioning / Air conditioning System / Ambient Temperature Sensor Repair procedures
| Inspection |
| 1. |
Turn the ignition switch OFF. |
| 2. |
Remove the front bumper.
(Refer to Body - "Front Bumper Cover") |
| 3. |
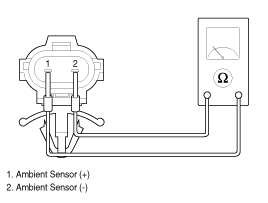
Disconnect ambient temperature sensor. |
| 4. |
Check the resistance of the ambient temperature sensor
between terminals 1 and 2 whether it changes by changing the ambient
temperature.
Specification
|
| 5. |
If the measured resistance is not within specification,
substitute with a known-good ambient temperature sensor and check for
proper operation. |
| 6. |
Replace the ambient temperature sensor if it is proved that there is a problem with the sensor. |
| Replacement |
| 1. |
Disconnect the negative (-) battery terminal. |
| 2. |
Remove the front bumper.
(Refer to Body - "Front Bumper") |
| 3. |
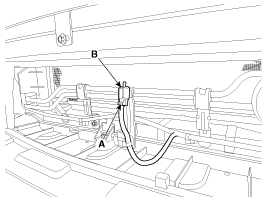
Disconnect the connector (A) and then remove the ambient temperature sensor (B).
|
| 4. |
Install in the reverse order of removal. |
 Ambient Temperature Sensor Description and Operation
Description
The ambient temperature sensor is located at the front of the
condenser and detects ambient air temperature. It is a negative type
thermistor; resistance will increase with lower te ...
 Auto Defogging Sensor (DATC only) Description and Operation
Description
The auto defogging sensor is installed on the front window
glass. The sensor judges and sends signal to blow out wind for defogging
if moisture occurs. On receiving the signal from ...
Other Information:
Description and Operation
Description
Emissions Control System consists of three major systems.
•
Crankcase Emission Control System prevents blow-by gas from
releasing into the atmosphere. This system recycles ...
Parking Brake & Brake Fluid Warning Light
This warning light illuminates :
Once you set the ignition switch or Engine Start/Stop Button to the ON position.
- It illuminates for approximately 3 seconds.
- It remains on if the parking ...
Categories
- Home
- First Generation
- Second Generation
- Third generation
- Kia Sedona YP 2014-2026 Owners Manual
- Kia Sedona YP 2014-2026 Service Manual

Copyright © www.kisedona.com 2016-2026