 Kia Sedona: Hood Latch Repair procedures
Third generation YP (2014-2024) / Kia Sedona YP Service Manual / Body (Interior and Exterior) / Hood / Hood Latch Repair procedures
| Replacement |
| 1. |
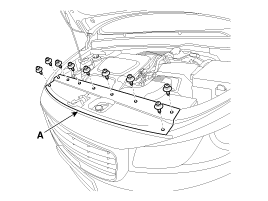
Loosen the fastener and remove the front bumper upper cover (A).
|
| 2. |
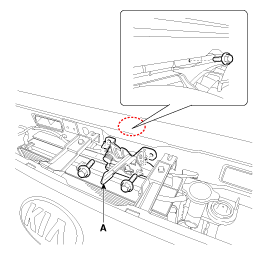
Remove the hood lower latch assembly (A) mounting bolts.
|
| 3. |
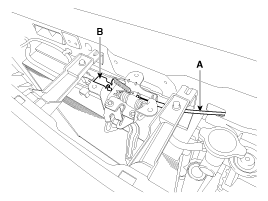
Disconnect the hood latch release handle cable (A) and connector (B).
|
| 4. |
Install in the reverse order of removal.
|
 Hood Latch Components and Components Location
Component Location
1. Hood lower latch assembly
...
 Tail Gate
...
Other Information:
Seat cooler (Air ventilation seat)
The temperature setting of the seat changes according to the switch position.
If you want to cool your seat cushion, press the switch (blue color).
Each time you press the button, the airflow ...
Components and Components Location
Components
1. Front pillar trim2. Cowl side trim3. Center pillar upper trim4. Center pillar assist trim5. Center pillar lower trim6. Rear pillar trim7. Tailgate fillar trim8. Front door scuff tri ...
Categories
- Home
- First Generation
- Second Generation
- Third generation
- Kia Sedona YP 2014-2024 Owners Manual
- Kia Sedona YP 2014-2024 Service Manual
Copyright © www.kisedona.com 2016-2024


